
Introduction: Unveiling the Magic of Horseshoe Bend
Searching for the most breathtaking, instantly recognizable natural wonder in the American Southwest? Look no further than Horseshoe Bend, the iconic geological masterpiece that has captivated millions.
Quick Overview of Horseshoe Bend
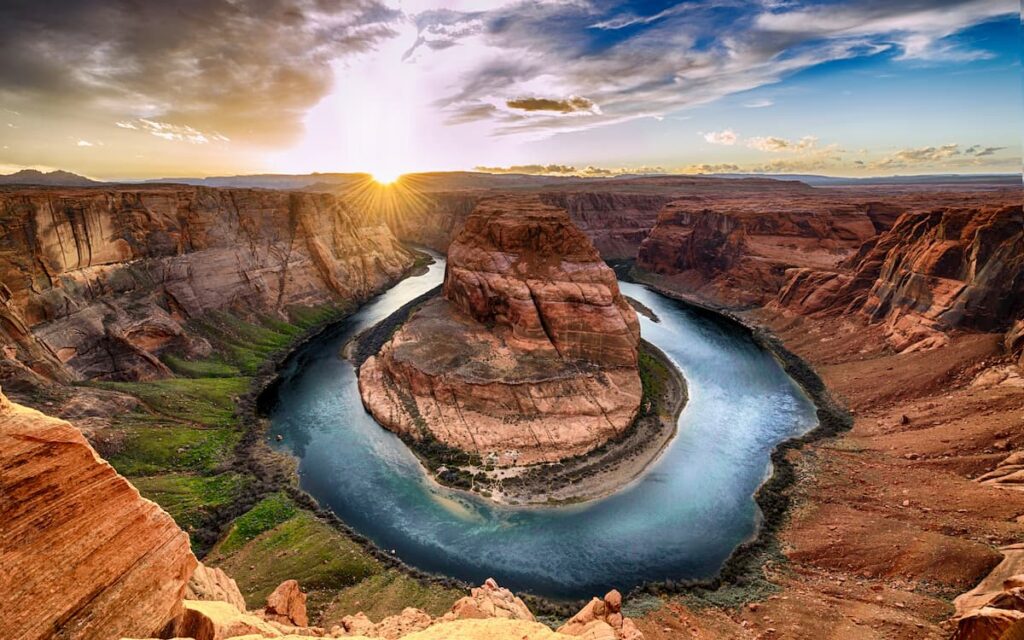
Horseshoe Bend is an awe-inspiring, 270-degree incised meander of the mighty Colorado River, located just outside the vibrant town of Page, Arizona. Standing at the overlook, visitors gaze down a sheer 1,000-foot (305-meter) drop to the river’s turquoise waters winding through the deep red-hued Navajo Sandstone canyon below.
This geological marvel is not a part of the Grand Canyon National Park, but rather falls within the Glen Canyon National Recreation Area, making it a perfectly accessible and essential stop on any Arizona or Utah road trip. Its name, of course, comes from the near-perfect horseshoe shape the river has carved over millions of years of erosion.
Why it’s One of the Most Popular Hikes in Arizona
In a state filled with world-class natural attractions, Horseshoe Bend stands out as a must-visit destination, drawing over two million visitors annually. Its immense popularity stems from a few key factors:
- The Unforgettable View: It provides a quintessential, bucket-list-worthy panorama that is instantly recognizable and looks even more dramatic in person than in pictures.
- Accessibility: The hike to the main overlook is a relatively easy, approximately 1.5-mile round-trip walk on a well-maintained, hardened path, making it accessible for families and most fitness levels.
- A Photographer’s Paradise: The lighting at sunrise and sunset creates spectacular colors and shadows across the canyon walls, making it one of the most photographed natural landmarks in the world—a true “social media darling.”
- Proximity to Other Gems: Its location near Page, Arizona, places it a short drive from other popular spots like Antelope Canyon and Lake Powell, allowing travelers to easily combine multiple adventures into one incredible journey.
Keep reading to discover everything you need to know to plan your own perfect visit to this magnificent Arizona hiking gem!
Table of Contents
What is Horseshoe Bend?
Horseshoe Bend is one of the most stunning and distinct natural formations in the world: a massive, nearly symmetrical 270-degree curve in the Colorado River. It is classified by geologists as an entrenched meander, meaning the river’s winding path was forced to cut vertically downward into the rock as the surrounding land slowly rose.
The contrast of the deep, emerald-green river against the vibrant red-orange Navajo sandstone cliffs, with a sheer drop of over 1,000 feet (305 meters), creates a powerful, cinematic vista unlike any other.
Location and History
Location
- State: Arizona
- Nearest Town: Page, Arizona (approximately 5 miles south)
- Geographic Area: Glen Canyon National Recreation Area
- Jurisdiction: The overlook trail and parking area are managed through a partnership between the City of Page and the Navajo Nation, while the canyon itself is part of the National Park Service’s Glen Canyon National Recreation Area.
History (Geological Formation)
The story of Horseshoe Bend is an epic spanning millions of years, rooted in two key geological events:
- Plateau Uplift (5-6 Million Years Ago): The area sits on the Colorado Plateau, which began to be slowly pushed upward by powerful tectonic forces. Before this, the Colorado River flowed relatively gently across a flat plain, developing its signature meandering, S-curve course.
- The Incised Meander: As the plateau rose, the river’s path was already established. The river, following the path of gravity, was forced to cut straight down through the rock layers instead of being diverted sideways. The constant, relentless force of the water carving through the softer, 200-million-year-old Navajo Sandstone created the steep, mile-wide, horseshoe-shaped gorge we see today.
The river is still actively eroding the canyon, slowly reshaping this natural monument for the future.
Why it’s a Must-See Landmark
Horseshoe Bend is more than just a photo opportunity; it is a profound testament to the power of water and time, making it a definitive Arizona landmark for several reasons:
- The Scale and Symmetry: The view is unparalleled. The almost-perfect U-shape of the bend, viewed from a dizzying height, offers a sense of grandeur that simply cannot be captured by a regular camera lens alone.
- The “Million-Dollar” Photo: It is one of the most Instagrammable spots in the US, especially at sunrise and sunset, when the light dramatically illuminates the canyon walls and the river below. The ease of access to this incredible viewpoint makes it a favorite for professional and amateur photographers alike.
- Accessibility: The approximately 1.5-mile (2.4 km) round-trip hike is relatively short and on a hardened, accessible trail, providing an immense reward for minimal effort compared to other major canyon views.
- Gateway to the Southwest: Its prime location makes it an ideal stop for travelers exploring other regional highlights, including the stunning slot canyons of Antelope Canyon, the serene waters of Lake Powell, and the north rim of the Grand Canyon.
Simply put, Horseshoe Bend offers one of the most concentrated displays of natural beauty and geological power in the American West.
Getting to Horseshoe Bend is quite straightforward, as it is a highly visible and well-marked landmark located very close to the town of Page, Arizona.
How to Get to Horseshoe Bend
Driving Directions from Page, Arizona
Horseshoe Bend is located just a few miles south of Page, Arizona, directly off of a major highway.
- Start in Page: Head South on US Highway 89 (US-89).
- Drive Time: The drive is short, typically taking only about 5 to 10 minutes from the main part of Page.
- Look for the Entrance: Drive approximately 5 miles (8 km) south on US-89.
- Turn-off: Look for the well-marked exit lane and sign for “Horseshoe Bend Overlook” located between mileposts 544 and 545. You will turn West (right, if driving south from Page) into the official parking area.
Parking Availability and Fees
The parking lot and trailhead are managed by the City of Page, not the National Park Service (NPS). This has a direct impact on the fee structure.
| Vehicle Type | Parking Fee (as of late 2024/early 2025) | Notes |
| Passenger Vehicles (Car, Truck, SUV, RV, Motorhome) | $10.00 | Covers all occupants of the vehicle. |
| Motorcycle | $5.00 | |
| Commercial Vehicles/Buses | Varies by size ($35 – $140) | Fees are based on passenger capacity. |
Key Parking Information:
- Payment: Fees are typically paid at a fee booth upon entry. Credit/debit cards are usually accepted, but visitors are often advised to have cash ready, especially on busy weekends and holidays, to minimize wait times.
- National Park Passes: America the Beautiful/National Park Passes are NOT accepted for the parking fee, as the lot is managed by the City of Page.
- Availability: The parking lot has been expanded and includes dedicated sections for cars, RVs, and buses. However, it can still fill up completely during peak hours (mid-day, especially in summer), and you may be required to return later.
- Illegal Parking: Parking on the shoulder of US Highway 89 is strictly prohibited, heavily enforced, and vehicles will be ticketed and towed.
The Trail to the Overlook:
Once parked, you must walk a 1.5-mile (2.4 km) round-trip trail to the viewpoint. The path is hardened and generally considered easy to moderate, with a slight incline at the beginning. Restrooms and shade structures are available along the trail, but not at the final overlook.
The hike to the Horseshoe Bend Overlook is a key part of the experience, offering a straightforward path to one of the most photographed natural attractions in the American Southwest.
Here is an overview of the hike:
Trail Length & Difficulty Level
| Feature | Details |
| Trail Length (Round-Trip) | 1.5 miles (approx. 2.4 km) |
| Difficulty Level | Easy to Moderate |
| Elevation Change | Minimal (approx. 130–150 feet) |
| Trail Surface | A hardened, packed-earth path that is wide and well-maintained. It is considered accessible under the Americans with Disabilities Act (ADA/ABA standards). |
| Conditions | The trail includes a slight incline on the way out, followed by a downhill slope to the rim. It is entirely exposed to the sun and has little to no natural shade. Two shade structures are available along the path. |
Average Time to Complete the Hike
The actual walking time is very short, but the total visit time is longer to account for viewing.
- Walking Time: 20 to 30 minutes (10–15 minutes each way) for a person walking at an average pace.
- Total Visit Time: 45 to 90 minutes is generally recommended to allow for walking, viewing the overlook, and taking photos.
Best Time of Day for Visiting
The best time to visit depends on your goals: avoiding crowds, getting ideal lighting for photos, or escaping the heat.
| Goal | Recommended Time | Rationale |
| Avoiding Crowds & Heat | Sunrise / Early Morning | Fewer people, cooler temperatures, and the sun is behind you, bathing the canyon walls in warm light. |
| Best Overall Lighting | Mid-day (10:00 AM – 2:00 PM) | The sun shines most directly down into the canyon, illuminating the entire bend and the water below, minimizing deep shadows. **However, this is the hottest and most crowded time. ** |
| Best for Dramatic Photos | Sunset | The most popular time. You will be looking west, directly into the setting sun, which creates shadows on the bend but can result in dramatic photos, vibrant sky colors, and the potential for a sunburst effect. Expect the largest crowds. |
Important Note on Heat: Regardless of your chosen time, the desert heat is extreme in the summer (May–September). Always carry plenty of water (1 liter per person is a good minimum), wear a hat, and use sunscreen. The ground temperature can be extremely hot for bare feet and pet paws.
The hike to the Horseshoe Bend Overlook is a short, well-traveled path designed to accommodate a high volume of visitors. While easy, there are specific desert conditions to be aware of.
What to Expect on the Trail
| Feature | Description |
| Trail Conditions & Terrain | The trail is 1.5 miles round-trip over a wide, well-defined path. It is officially described as an Architectural Barriers Act (ABA) compliant trail, meaning it is considered accessible for wheelchairs and strollers. The surface is a hardened, packed-earth or packed-gravel mixture, though it may have sections of loose sand. |
| Elevation | The path has minimal elevation change (about 130–150 feet). The walk involves an initial slight uphill section from the parking lot, followed by a gentle downhill slope to the rim. The return trip will be the reverse: an uphill climb back to the parking lot. |
| Shade & Sun Exposure | The entire trail is in a desert environment and is extremely exposed with virtually no natural shade from trees or canyon walls. |
| Man-made Shade | To help hikers, two shade structures (shelters) with benches have been installed along the length of the trail for brief relief from the sun. There is no shade at the overlook itself. |
| The Overlook | At the viewpoint, a modern, fenced platform has been installed for safety. However, much of the rim remains exposed to the 1,000-foot drop, and visitors may choose to walk on the surrounding sandstone slabs, which can be uneven or slippery due to sand. Caution is essential. |
Key Advice: Due to the intense sun exposure and desert heat, especially in summer, it is crucial to bring plenty of water, wear a hat, and apply sunscreen. Avoid hiking during the hottest part of the day (mid-day).
To ensure a safe and enjoyable visit to the Horseshoe Bend Overlook, preparing for the desert environment and the cliff-edge exposure is critical.
Water & Hydration Importance
The Arizona desert heat, especially during the summer, can be intense and lead to dehydration or heat-related illness quickly, even on a short walk.
- Bring Ample Water: It is highly recommended to bring a minimum of 1 liter of water per person for the short, 1.5-mile round-trip hike. Since the walk often takes longer than expected due to photo-taking and enjoying the view, having extra is essential.
- No Water Available: There is no water available for purchase or refilling at the trailhead or along the path. You must bring all your water with you.
- Stay Ahead of Thirst: Drink water frequently, even if you don’t feel thirsty. By the time you feel thirsty, you are already beginning to dehydrate.
- Electrolytes: Consider bringing salty snacks or an electrolyte solution to help balance your body’s fluid levels, particularly on hot days.
Heat Safety & Footwear Recommendations
Heat Safety
The trail has minimal shade, making sun exposure the primary risk factor.
| Hazard | Recommendation |
| Sun Exposure | Wear a wide-brimmed hat and sunglasses. Apply and re-apply high-SPF sunscreen frequently, especially to exposed skin. Lightweight, light-colored clothing, or UV-protective (UPF) clothing, is also advisable. |
| Extreme Heat | Avoid hiking during the hottest part of the day, which is generally from mid-morning to late afternoon. The coolest times to visit are at sunrise or just before sunset. |
| Heat Illness | Know the signs of heat exhaustion (heavy sweating, paleness, muscle cramps, dizziness) and heat stroke (no sweating, red/hot skin, confusion, throbbing headache). If symptoms occur, get to one of the two shade shelters immediately and cool down. |
| Pets | Be mindful of your pet’s paws. The ground, especially the sand and rock, can become hot enough to cause burns in the sun. Consider booties or carry your pet over the hottest surfaces. Never leave a pet in a vehicle. |
Footwear Recommendations
- Sturdy, Closed-Toe Shoes: This is the most highly recommended footwear. Hiking boots, trail running shoes, or sturdy sneakers provide the best traction for walking on the hard-packed trail and the slicker, natural sandstone at the overlook.
- Avoid: Flip-flops, sandals, or high heels are generally discouraged. Not only do they offer no protection from the extreme heat of the desert surface, but they also provide poor traction on sandy and uneven rock surfaces near the edge.
- Sand and Dirt: Expect your shoes to get covered in the fine, red sand and dirt.
General Safety Tips
- Cliff Safety: The majority of the canyon rim is unfenced. Maintain a safe distance from the edge, as the sandstone can be unstable, slippery, and crumble. Fatal falls have occurred.
- Supervise Children and Pets: Keep children and leashed pets close and well away from the cliff edge at all times.
- Stay on the Trail: Remain on the designated trail to protect the fragile desert ecosystem and for your own safety.
- Emergency: There is no park ranger station at the trailhead. In the event of an emergency, call 911.
The “best” time to visit Horseshoe Bend depends entirely on your priorities: avoiding crowds, beating the heat, or getting the best photographs.
The most popular times to visit are mid-day (for full light) and sunset (for dramatic colors). However, sunrise offers the best balance of a quality experience with fewer people.
Sunrise vs. Sunset at Horseshoe Bend
The viewpoint faces due West, meaning the sun rises behind you and sets in front of you. This is the key difference for lighting and photography.
| Feature | Sunrise (Recommended for Peace) | Sunset (Recommended for Drama) |
| Crowds | Minimal. The parking lot opens at sunrise, and you’ll share the view with far fewer people. | Heavy. This is the most popular time; expect the parking lot to fill and the overlook to be crowded. |
| Temperatures | Cooler. Ideal for hiking to and from the overlook, especially during the hot summer months. | Cooling Down. Comfortable temperatures, but the heat of the day will linger for the first part of the hike. |
| Photography | Excellent Light after the sun has cleared the horizon. The sun is at your back, gradually lighting the canyon walls in warm, soft light with clear views of the river. | Challenging Light. You are shooting directly into the setting sun. This can create glare and heavy shadows in the canyon, but also beautiful, dramatic colors in the sky and a “sunburst” effect. |
| The View | The canyon and river will initially be in deep shadow as the sun rises behind you, but will brighten and glow beautifully as the sun gets higher. | The canyon often falls into shadow before the sun fully sets, but the sky will be filled with vibrant colors. The rock walls and rim will glow with warm, golden light. |
Mid-Day Visit (10:00 AM – 3:00 PM)
A mid-day visit is a common choice for many tourists due to scheduling, but it has significant drawbacks.
| Pros | Cons |
| Full Illumination | Extreme Heat |
| The river and the entire bend are fully lit with no large shadows, which can be ideal for capturing the true colors of the water and rock. | The sun is directly overhead, leading to the hottest part of the day and an exhausting, exposed hike. Highest risk of heat-related illness. |
| Clear View | Harsh, Flat Light |
| No sun glare in your lens, which can simplify general photography. | The colors of the rock and sky can look “washed out” or flat due to the intense, direct sun, lacking the warm tones of sunrise or sunset. |
| Good for a Quick Stop | Highest Crowds |
| It’s easy to fit into a schedule between other tours (like Antelope Canyon). | This is often the peak time for tour buses and general visitors, leading to heavy crowding. |
Conclusion: If your priority is a calm, less-crowded experience and comfortable hiking, Sunrise is the best choice. If you are willing to brave the crowds for a dramatic, colorful sky, choose Sunset (and arrive an hour early to secure parking and a good spot).
The absolute Best Time to visit Horseshoe Bend, considering both weather and crowds, is during Fall (September to early November) or Spring (March to May).


Here is a detailed breakdown of what to expect in each season:
Seasonal Guide to Horseshoe Bend
| Season | Typical High Temperatures | Crowds | Photography/Lighting |
| Spring (Mar – May) |  | High | Excellent soft light in the morning and evening. Ideal hiking weather. |
| Summer (June – Aug) | | Very High (Peak) | Midday sun is very harsh; best avoided. Early sunrise or late sunset is critical. |
| Fall (Sept – Nov) | | Moderate to Low | Generally considered the best time of year for photography, comfort, and smaller crowds. |
| Winter (Dec – Feb) | | Lowest (Off-Season) | Comfortable mid-day viewing; very cold at sunrise/sunset. Chance of rare, beautiful snow. |
1. Spring (March – May)
| Pros | Cons |
| Ideal Weather: Temperatures are warm and pleasant, perfect for the short but exposed walk to the overlook. | High Crowds: This is a very popular time, especially May, as it coincides with spring break and good weather. |
| Longer Daylight: Allows for more flexible timing for both sunrise and sunset visits. | Higher Prices: As a peak season, travel and lodging prices around Page, AZ, may be higher. |
2. Summer (June – August)
| Pros | Cons |
| Longest Days: Maximize your sightseeing time in the region. | Extreme and Dangerous Heat: Temperatures frequently exceed 95∘F (35∘C), sometimes reaching over 100∘F (38∘C). The exposed trail offers no escape from the sun. |
| Vibrant Views: Mid-day visitors get full sun illuminating the entire canyon (if you can tolerate the heat). | Highest Crowds: The busiest time of year, with parking lots frequently filling up. |
| Monsoon Season: Late summer (July-Sept) brings the possibility of intense, brief afternoon thunderstorms, which can be dangerous on the exposed rim. |
3. Fall (September – November) (Overall Best Time)
| Pros | Cons |
| Excellent Weather: Temperatures are mild and comfortable, gradually cooling as the season progresses. | Fading Light: Daylight hours start to shorten, requiring more precise timing for sunrise/sunset. |
| Moderate Crowds: Crowds begin to thin significantly after the peak summer season, offering a more enjoyable experience. | Possible Rain: October is historically the month with the highest precipitation, though rainfall is generally low in the region. |
| Best Light: The angles of the sun are often cited as providing the warmest, most flattering light on the canyon walls. |
4. Winter (December – February)
| Pros | Cons |
| Fewest Crowds: The least busy time of year, making parking easy and the viewpoint much quieter. | Freezing Temperatures: Sunrise and sunset visits will be extremely cold, with temperatures often dropping below freezing at night. |
| Comfortable Mid-Day: A midday visit is comfortable and pleasant, avoiding the harsh heat of summer. | Shorter Days: Limited daylight hours for exploration. |
| Unique Views: While rare, a light dusting of snow on the red rocks can create a beautiful and unique photo opportunity. | Low Visibility/Clouds: The sky tends to be cloudier in the winter months compared to the summer. |
Horseshoe Bend is one of the most photographed natural landmarks in the world. Getting the “perfect” shot involves a combination of the right time of day, gear, and positioning.
Here are the best photo angles, where to stand, and essential tips for photographing Horseshoe Bend:
1. Best Time for Photography (Lighting)
The viewpoint faces due West, making sunrise and sunset the most dramatic times for light, but also presenting unique challenges.
| Time of Day | Lighting Effect | Pros | Cons |
| Sunrise (Golden Hour) | Soft, warm light illuminates the far side of the canyon. The bend itself will start in shadow. | Fewer crowds, cooler temperatures, peaceful atmosphere. Great for vibrant colors in the sky and on the eastern walls. | The river below (the bend) will be in deep shadow for a while, creating high contrast. You must hike in the dark. |
| Midday (10 AM – 4 PM) | Direct, overhead sun. | The sun fully lights the entire canyon and the river below, eliminating all shadows. | Harshest heat, maximum crowds, and the light is often described as “flat” or “washed out.” |
| Sunset (Golden Hour/Blue Hour) | Dramatic, fiery colors in the western sky. The sun sets directly behind the bend. | Stunning, dramatic sky and rim glow. Excellent for capturing a sunburst effect. | Heavily crowded, you are shooting directly into the sun (lens flare is a major issue), and the bend below will be in shadow. |
| Post-Sunset (Blue Hour) | Even light after the sun dips below the horizon. | Canyon and sky colors even out, and reflections on the river can become more prominent. Less crowded than peak sunset. |
General Recommendation:
- For the full bend lit up: Midday offers full light, but the heat is dangerous. The sweet spot for a well-lit river is often a few hours before or after noon (e.g., 9:30 AM to 1:00 PM in the shoulder seasons).
- For dramatic color: Sunrise or Sunset. Arrive well in advance to secure a spot.
2. Best Photo Angles and Where to Stand
The viewpoint is a large, open semi-circle, but only a small portion has a safety railing.
For the “Classic Shot” (The Whole Horseshoe)
- Where to Stand: You need to be as close to the center-line of the rim as safely possible. You will likely need to move past the fenced overlook to the open, unfenced sandstone areas on either side to get the entire loop in one frame without a barrier.
- Angle: The viewpoint is so close to the formation that you have to stand near the very edge to capture the entire 1,000-foot drop and the river below.
- Gear: This shot absolutely requires a wide-angle lens (typically 14mm – 18mm on a full-frame camera or equivalent on a crop sensor). Otherwise, you will only capture a portion of the bend.
For a Unique Perspective / Sense of Scale
- Where to Stand: Walk further left or right along the rim from the main viewing platform.
- Angle: Look for a unique rock formation or a small bush to use as a foreground element to add depth and interest. Including people (safely!) near the edge can also effectively convey the massive scale of the canyon.
- Gear: Consider using a telephoto lens (70mm+) from the rim. This will compress the scene, making the opposite canyon walls and the river look closer and more dramatic than they appear with a wide-angle lens.
3. Essential Photography Tips
- Go Wide or Go Panorama: To capture the entire bend, you need an ultra-wide lens. If you don’t have one, use your phone’s Panoramic mode or shoot several vertical overlapping photos (vertical panorama/stitch) with a standard lens and stitch them together in post-processing software.
- Bring a Tripod: Essential for sharp shots in low light (sunrise/sunset) or for multi-shot panorama stitching. It also helps when setting up a low angle to get the best view over the cliff face.
- Manage Dynamic Range: The difference between the bright sky and the deep shadows of the canyon is extreme. You will need one of these techniques to get a balanced photo:
- HDR (High Dynamic Range): Take 3 or 5 bracketed exposures (underexposed, normal, overexposed) and merge them in software.
- Graduated Neutral Density (GND) Filter: A filter that is dark on top and clear on the bottom can help darken the bright sky to match the canyon.
- Use a Polarizer (CPL): A polarizing filter is invaluable, especially during the day, to reduce glare/reflections on the river and intensify the deep blue-green color of the water.
- Focus Carefully: If using a very wide lens, remember to focus on a point that keeps both the immediate foreground (the rock ledge) and the distant background (the bend) in focus. Many photographers use the Hyperfocal Distance technique to achieve maximum sharpness across the entire scene.
Disclaimer: The cliffs are a sheer 1,000-foot drop. The sandstone near the edge can be slippery or unstable. For your safety and the safety of others, do not venture too close to the edge for a photo, regardless of what you see others doing. No photo is worth the risk.
The dramatic scale and high contrast lighting at Horseshoe Bend require specific gear and attention to camera settings, especially during sunrise or sunset.
Here is a breakdown of the recommended equipment and settings for stunning photos:
1. Recommended Gear for Stunning Photos
| Gear Type | Specific Recommendation | Why It’s Essential |
| Wide-Angle Lens | Full-Frame: 14mm – 20mm | To capture the entire horseshoe-shaped bend in one frame, a very wide lens is mandatory. Standard lenses (like 24mm or 28mm) will cut off the edges. |
| Sturdy Tripod | Travel-friendly but solid | Essential for sharp photos in low light (sunrise/sunset), especially when using bracketing/HDR or for a multi-shot panorama stitch. It also helps with precise composition near the edge. |
| Polarizing Filter (CPL) | Standard or Circular | Reduces glare off the river and water, dramatically increasing the saturation and contrast of the canyon walls and the blue-green water below. |
| Graduated Neutral Density (GND) Filter | 2- or 3-Stop (Soft or Reverse) | Highly recommended for sunset/sunrise. The bright sky and dark canyon create extreme contrast. This filter darkens the sky while leaving the canyon exposed correctly, balancing the image. |
| Shutter Release | Cable or Wireless Remote | Prevents camera shake when taking long exposures or bracketing shots on a tripod, ensuring the sharpest possible image. |
| Phone Lens Attachment | Wide-Angle Clip-On | If using a phone, this can help you capture more of the scene than the phone’s native wide-angle, which is often not wide enough. |
2. Recommended Camera Settings (DSLR/Mirrorless)
Since the scene has high dynamic range, using your camera’s Manual (M) mode or Aperture Priority (A/Av) mode is best to ensure maximum image quality.
| Setting | Recommendation | Why |
| File Format | RAW | Captures the maximum amount of detail in both highlights (sky) and shadows (canyon), which is crucial for editing high-contrast scenes. |
| Aperture (f-stop) | f/8 to f/14 | This narrow aperture ensures a deep depth of field, meaning everything from the foreground rock edge to the distant bend will be in sharp focus. |
| ISO | ISO100 or ISO200 | Keep it as low as possible to minimize digital noise, maximizing image quality. (A tripod is required for this low ISO at sunrise/sunset). |
| Shutter Speed | Variable (Based on Light) | Adjust this last to get the correct exposure. On a tripod, it could range from 1/100 sec in midday to 1 second or longer at sunset/sunrise. |
| Focus | Manual Focus using Hyperfocal Distance | This is the most reliable way to achieve total sharpness. If you don’t know this technique, manually focus about 1/3 of the way into the scene. |
| White Balance (WB) | Daylight or Cloudy | Using a specific setting (not Auto) ensures consistent color across all your photos. Daylight is a safe choice, or set a custom Kelvin temperature for a warmer look. |
The Power of HDR/Bracketing
At sunrise and sunset, the light difference is extreme (up to 7 stops). You must use Exposure Bracketing (also known as HDR):
- Set your camera to bracket (e.g., ±2 stops).
- Take a sequence of shots quickly (e.g., -2 EV, 0 EV, +2 EV).
- Combine these images later in software like Adobe Lightroom or Photoshop to create one perfectly exposed picture with detail in the bright sky and the dark canyon.
3. Recommended Phone Settings
Modern phones can capture a fantastic image, but you must move beyond the basic automatic mode.
| Feature | Phone Setting Tip | Why It Helps |
| Wide View | Use the phone’s Ultra-Wide Lens or Panorama Mode. | The main camera often cannot fit the entire bend. Panorama is the best way to capture the whole scene. |
| Exposure Control | Tap-and-Drag Exposure Slider Down. | The bright sky often tricks the phone into overexposing the image. Drag the exposure slider down manually to protect the sky details. |
| HDR Mode | Enable Auto HDR (or HDR Enhanced). | The phone will automatically take multiple exposures and merge them to balance the bright sky and dark foreground/canyon. |
| Stability | Use a Mini-Tripod or brace the phone on a rock. | Essential for a sharp image, especially when using the panorama mode or low light. |
| Night Shot (Astro) | Use the phone’s Night Mode on a tripod. | If staying after dark, a long-exposure night mode can reveal stars and even the Milky Way over the canyon. |
In addition to your list, here is a complete checklist of essential items for the hike to Horseshoe Bend, focusing on the desert environment and photography needs.
The trail is about 1.5 miles (2.4 km) round trip on a mostly packed dirt path with minimal shade. Preparation for the intense sun and heat (especially in summer) is crucial.
Essential Things to Bring for the Hike
| Category | Essential Items | Notes & Why You Need It |
| Hydration & Fuel | Water Bottle & Snacks | Critical: Bring at least 1 liter of water per person (more in summer). The desert heat causes quick dehydration. Pack light, high-energy snacks like granola bars. |
| Electrolytes | A sports drink or electrolyte tablets are great for extremely hot days to replenish salts lost from sweating. | |
| Sun Protection | Hat (wide-brimmed) | Your list’s hat should ideally be wide-brimmed for maximum protection, as there is almost no shade on the trail or at the rim. |
| Sunscreen & Lip Balm (with SPF) | Apply liberally before starting and reapply at the viewpoint. The sun’s intensity is high. | |
| Sunglasses (Polarized are best) | Protects your eyes and helps reduce glare off the river below for a clearer view. | |
| Footwear & Clothing | Comfortable Walking Shoes | Sturdy, closed-toe shoes are best. The trail is packed earth and sand, and the sand can be extremely hot in the summer. |
| Light Layers | Especially for sunrise/sunset. A long-sleeve sun shirt is excellent for sun protection and wicking sweat, and a light jacket is perfect for the cooler mornings/evenings. | |
| Safety & Convenience | Camera/Phone | As discussed previously, to capture the iconic view. |
| Small Day Pack/Backpack | To comfortably carry your water, snacks, camera gear, and layers, keeping your hands free (crucial when near the cliff edge). | |
| First Aid Kit (small) | Basics like band-aids and blister protection (moleskin) are always a good idea. | |
| Headlamp or Flashlight | Essential for sunrise or sunset visits. You will be hiking in the dark to/from the parking lot. |
Safety Tip: Respect the Edge
A final note on safety: much of the rim, away from the fenced viewing platform, has no railing. The drop to the Colorado River is about 1,000 feet. Stay vigilant, watch your footing on the sandy/slick rock, and keep a safe distance from the edge. A stunning photo is never worth the risk.
That’s an excellent list of the main attractions near Horseshoe Bend!
Here is a breakdown of what you can do at each location and a bonus attraction, all located in the immediate Page, Arizona area.
Nearby Attractions Around Horseshoe Bend
1. Antelope Canyon
This is arguably the most famous attraction near Horseshoe Bend. It is a stunning, narrow slot canyon on Navajo land, famous for its smooth, wave-like sandstone walls and the beams of light that stream through the openings.
- Key Detail: Visiting requires a guided tour with an authorized Navajo tour company. You cannot enter on your own.
- Two Main Sections:
- Upper Antelope Canyon: Easier to walk (flat) and famous for the spectacular light beams that often appear around mid-day, especially in the warmer months.
- Lower Antelope Canyon: Longer, requires climbing and descending ladders, and has a more V-shaped structure with dramatic colors and formations.
- Tip: Book your tour well in advance, as popular time slots (especially for light beams) sell out quickly.
2. Lake Powell / Glen Canyon National Recreation Area
Lake Powell is the second-largest man-made reservoir in the United States, created by the Glen Canyon Dam. The lake itself is part of the vast Glen Canyon National Recreation Area.
- Main Activities:
- Boating & Water Sports: Rent a houseboat, powerboat, jet ski, kayak, or paddleboard from marinas like Wahweap or Antelope Point to explore the lake’s hundreds of miles of shoreline and slot canyons.
- Viewpoints: Drive to the Wahweap Overlook for a massive panoramic view of the lake and surrounding desert.
- Hidden Canyons: Boat trips can take you to famous sites like Rainbow Bridge National Monument (one of the world’s largest natural bridges) or the narrow, water-filled section of Antelope Canyon.
3. Glen Canyon Dam / Carl Hayden Visitor Center
Located on the Colorado River a few miles north of Page, the massive Glen Canyon Dam created Lake Powell.
- Main Activity: The Carl Hayden Visitor Center sits right above the dam.
- It offers incredible views of the dam, Lake Powell on one side, and the Colorado River on the other.
- Exhibits explain the geology of the area and the history of the Colorado River’s water management.
- Note: Public tours of the dam itself are sometimes suspended due to security measures, so it’s best to check the current status with the National Park Service.
Bonus Nearby Attraction: The Wave (Coyote Buttes North)
If you are a serious hiker with flexible time, this is a world-famous, challenging, and stunning destination.
- Key Detail: Extremely difficult to get a permit. Only 64 people are allowed per day.
- Permit Process: Permits are issued through two online lotteries on Recreation.gov:
- Advanced Lottery: Held four months in advance.
- Daily Lottery: Held two days before the desired hike date and requires you to be physically present in a designated geofenced area near Page, AZ or Kanab, UT to apply via the mobile app.
- Tip: If you can’t get a permit for The Wave, explore other nearby, beautiful areas in the Vermilion Cliffs National Monument that are easier to access, such as White Pocket.
Here are the answers to your frequently asked questions about the Horseshoe Bend hike in Arizona:
How long is the hike?
- Distance: The hike to the overlook and back is 1.5 miles (2.4 km) round trip.
- Time: It typically takes about 45 minutes to 1 hour round trip, depending on your pace and how long you spend at the viewpoint.
- Difficulty: The trail is rated Easy. It is a hardened, well-maintained path with a gentle downhill slope on the way to the overlook, which means you will have a slight uphill climb on the return to the parking lot.
Is Horseshoe Bend kid-friendly?
Yes, it is generally considered kid-friendly, but with a major safety warning:
- Trail: The trail is wide and well-marked. It is designed to be Architectural Barriers Act (ABA) compliant, making it suitable for strollers and wheelchairs (though assistance may be needed for the sandy parts and slight incline).
- Overlook Safety: Only a small portion of the main viewing platform has a protective railing. The vast majority of the rim is an unprotected, sheer 1,000-foot drop. Extreme caution is essential, and children must be closely supervised at all times.
Can I bring pets on the trail?
Yes, pets are permitted on the trail.
- Rules: Pets must be kept on a leash (6 feet or shorter) at all times.
- Safety Warning: Be very mindful of the desert heat. The ground temperature can be extremely hot for their paws, especially during midday in the summer. Always bring plenty of water for your pets.
Is there an entrance fee?
No, there is no separate entrance fee to the Horseshoe Bend Overlook itself, as it is part of the Glen Canyon National Recreation Area (which is usually free).
However, you must pay a parking fee to access the trailhead.
- Fee Structure: The parking lot is managed by the City of Page, AZ, and a fee is charged per vehicle.
- Passenger Vehicles (Car/RV): Typically $10 per vehicle.
- Motorcycles: Typically $5 per motorcycle.
- Note: Federal passes like the America the Beautiful Pass are NOT accepted for the parking fee.
Here is a concluding summary of why Horseshoe Bend is a must-visit and essential final tips for your trip.
Conclusion
Recap: Why Horseshoe Bend is Worth the Visit
Horseshoe Bend is one of the American Southwest’s most iconic and essential stops, offering a quick, high-impact adventure that is worth every moment:
| Reason to Visit | Details |
| The View | It is the classic, dramatic, 270-degree curve of the emerald-green Colorado River carved 1,000 feet below a reddish-orange sandstone cliff. It is one of the most photographed geological formations in the world. |
| Accessibility | The short, well-maintained 1.5-mile round-trip trail makes it accessible to almost everyone, including families and those with limited mobility. |
| Proximity to Other Gems | It serves as a perfect complement to a trip to nearby world-class attractions like Antelope Canyon, Lake Powell, and the Glen Canyon Dam. |
Final Hiking Tips for First-Time Visitors
To ensure a safe and enjoyable experience, keep these final tips in mind:
- Hydrate and Protect: This is a desert environment with minimal shade. Carry much more water than you think you need, especially in the warmer months. Wear a hat, sunglasses, and apply sunscreen generously.
- Timing is Everything:
- Best Light: Visit either at sunrise or sunset for the most dramatic colors and lighting.
- Avoid Midday Heat: Avoid hiking between 10:00 AM and 4:00 PM during the summer to escape dangerous temperatures.
- Safety First at the Edge: Be extremely careful at the overlook. There is only a small railed section, and the rest of the rim is a sheer drop. Do not attempt risky photos, and keep a very close watch on children and pets.
- Parking is Fee-Based: Remember that you must pay the parking fee (typically $10 per vehicle) to access the trailhead. Federal National Park passes do not apply to this city-managed lot.
- Check Vehicle Size Requirements: If you are driving an RV or bus, be aware of the varying parking fees. Parking outside the designated lot on the highway is strictly prohibited.